Double Chain

Weekend is almost here and it's time to glam up for the parties you're going to attend. If you liked winter's baroque trend you can still rock it with some hints of black and gold, maybe in the form of this chunky necklace/choker. It is way too easy to make and it will be ready just in time for a girls night out or a gallery opening.
Se apropie weekendul si este timpul sa va pregatiti pentru petrecere. Daca v-a placut trendul baroc din aceasta iarna, inca il mai puteti purta apeland la mici accente negre si aurii, poate in forma acestui colier masiv. Este foarte usor de facut si va fi gata la timp pentru o iesire cu fetele sau un vernisaj.


Here is what you'll need:
Iata de ce veti avea nevoie:

1. two chains, black and gold, as long as your neck circumference; 2. white or black embroidery thread; 3. a large jump ring; 4. large lobster clasp
1. doua lanturi, nagru si auriu, de lungimea circumferintei gatului; 2. ata mouline alba sau neagra; 3. o za mare; 4. o inchizatoare lobster mare


And now follow these steps to create it:
Si acum urmati acesti pasi pentru a-l crea:

1. you will need a few or more white threads which are six times the length of the chain
2. fold the threads in half and attach the clasp at the folding point, securing it with a knot
3. align the two chains parallel in front of you and insert each side of the threads through the first chain mail
4. start crisscrossing the white threads jumping from the gold chain to the black one, just like shoe laces
5. when you reach the end of the chains, attach a jump ring and secure it with a knot
6. add a little clear nail polish on the knot to seal it

1. veti avea nevoie de mai multe bucati de ata, de sase ori mai lungi decat bucatile de lant
2. indoiti atele la jumatate si atasati inchizatoare in punctul de mijloc, fixand-o cu un nod
3. asezati lanturile paralele in fata voastra si treceti atele de fecare parte prin zale
4. continuati sa treceti cu atele prin fiecare za, mergand in zigzag si sarind de pe lantul negru pe cel auriu
5. cand ajungeti la capat atasati zaua de inchidere, fixand-o cu un nod
6. aplicati un strop de lac de unghii transparent pe nod pentru a-l sigila

That's it! A little rock'n'roll glam accent for your black dress or leather jacket.
Si gata! Un accent glam si rock'n'roll pentru rochia neagra sau geaca de piele.


Have a great weekend!
Sa aveti un weekend minunat!
Love, 
L.  

Hoodie to skirt

It was about time for the sun to start shining on these skies. And it's about time to prepare our spring wardrobe, to hide all the heavy and bulky sweaters and replace them with flowy summerish dresses. And maybe it'a a good idea to transform some of your winter clothes in new spring ones, like I did with this hoodie :)


You will need:


1. a hoodie with zipper large enough to go around your hips; 2. a paper pattern for a mini skirt; 3. measuring tape, 4. chlak; 5. scissors; 6. sewing machine or thread and needle

About the pattern, it's not that difficult so you can make it yourself. Just use this sketch to draw one.


1. create your pattern;
2. rip off the seams of your hoodie; detach the front from the back and remove the pockets if they exist,
3. cut the sides right where the sleeves start;
4. place the pattern on both sides and cut
5. assemble all the pieces and hold them together with pins
6. sew the sides together on the wrong side


And ta-daaaa. Here is your new mini skirt with a zipper ready to wear. Put on some sneakers and go for a walk in the park.


Love,
L.

Sunday Smoothie: Banana&Pear / Banane&Pere

Daca sunteti la fel de norocosi ca mine sa aveti bunici cu casa la tara si livada atunci stiti care este gustul adevarat al perelor, zemoase si dulci. Voi aduce acel gust al toamnei timpurii in smoothie-ul de azi.
If you are as lucky as me and you have grandparents living in the countryside and they have an orchard, than you know the real taste of pears, juicy and sweet. I want to bring that early autumn taste in today's smoothie.


Ingrediente: 2 pere, 2 banane, o cana de iaurt dulce, o lingura de miere, o lingura de musli
Ingredients: 2 pears, 2 bananas, une cup sweet yogurt, one spoon honey, one spoon granola 


Duminica placuta!
Enjoy your sunday!
L.


French Ombre

Tineti minte isteria de anul trecut cu efectul ombre? Ei bine, mie nu mi-a trecut. Si daca pe atunci il obtineam cu vopsea sau cu clor acum o sa-l facem cu ajutorul broderiei. Vom folosi tehnica numita nodul frantuzesc pentru a umple bretele unui maieu cu sute de bulinute in nunate de verde...sau de orice culoare va place.
Do you remember last year's ombre craze? Well I'm not over it yet. And if by then I used dye and bleach to get that effect, this time we're going to do it with embroidery. We're going to use an embroidery technique called french knot to fill in the strapt of a tank top with small dots in green hues...or any other hues you like.  


Aveti nevoie de:


1. un maieu uni; 2. ata mouline in mai multe nuante din aceeasi culoare; 3. ac de cusut; 4. muuuuulta rabdare :)
You'll need:
1. a solid color tank top; 2. embroidery thread; 3. sewing needle; 4. a looooot of patience :)


1. incepeti cu cea mai inchisa dintre culori; bagati ata in ac si faceti un nod la capatul liber; treceti acul prin breteaua maieului
2. puneti acum in fata atei si rasuciti de doua ori ata in jurul acului, de la ureche spre varf
3. infigeti acul imediat langa locul prin care l-ati scos si cu mana stanga(sau dreapta pentru stangaci) trageti usor de ata infasurata pe ac astfel incat sa stea lipita de ac
4. trageti apoi acul pe partea cealalata pana la capat
1. start with the darkest hue you have; thread the needle and tie a knot at the loose end; pull the needle through the fabric
2. put the needle in front of the thread and twist the thread twice around the needle, from the needle's hole to the tip
3. insert the tip of the need right next to the exit point and with with your left hand (or right for left handed persons) pull the thread lightly to get it tight around the needle
4. pull the needle all the way through  


Continuati sa faceti astfel de noduri trecand de la o culoare la alta pentru a crea efectul ombre. Trebuie sa aveti ceva timp liber si putina rabdare pentru a acoperi chiar si o suprafata asa mica precum o bretea(mie mi-a luat 4 ore), dar merita!
Continue to make these knots passing from dark to light colors to create the ombre effect. You must have some time on your hands and a lot of patience to cover even a small area like this strap (it took me about 4 hours :-O ), but it's worth it!

Cu drag,
Love,
L


Sunday Smoothie: Banana&Blueberry

Zilele trecute am dat intr-un supermarket peste o caserola de afine care, surprinzator, nu costa o avere, asa ca m-am simtit obligata sa o adaug in cosul de cumparaturi. Afinele sunt unele dintre preferatele mele sub orice forma, mai putin consumate ca atare. Deci m-am gandit sa le pun repede intr-un smoothie mov.
A few days ago I bumped into some fresh blueberries that weren't costing a fortune so I felt much obliged to add them to my shopping cart. Blueberries are one of my favorites to eat in any form, jam, syrup, muffins, pancakes, steak sauce, except as they are. So I decided to throw them in a mauve smoothie. 


Ingrediente: 1/2 cana afine proaspete, 1 cana iaurt dulce, 2 banane, 1 lingura miere, musli pentru decor
Ingredients: 1/2 cup fresh blueberries, 1 cup sweet yogurt, 2 bananas, 1 tablespoon honey, granola for garnish


De fiecare data cand vad afine imi aduc aminte de secventa din Charlie and the Chocolate Factory. Sper sa nu imi iau si eu zborul :D
Every time I see blueberries I think about the scene in Charlie and the Chocolate Factory. Let's hope I won't blow up and fly :D

Duminica placuta!
Enjoy your Sunday!
L.

Glam Eggs

Daca saptamana trecuta v-am aratat cum puteti vopsi ouale intr-un mod cat mai natural, saptamana asta vreau sa va arat fix opusul: oua aurii ca de basm folosind diferite tehnici cu rezultate diferite, dar cu acelasi efect WOW!
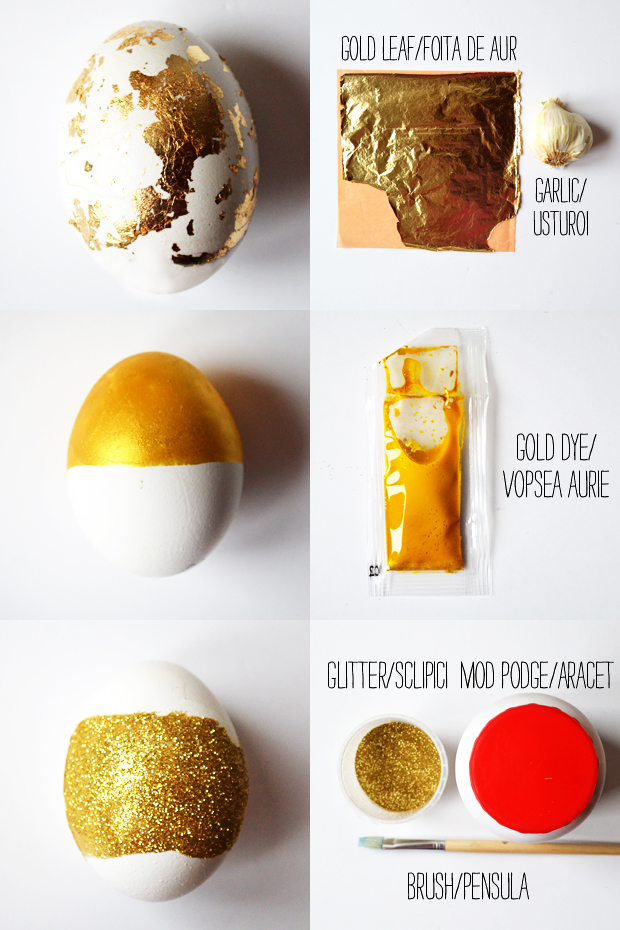
If last week I showed you how you can dye your eggs with natural dye, this week I want to go the other way around: golden fairytale eggs using three different techniques with three different result but with the same WOW effect!


In primul rand pentru fiecare din cele 3 tehnici veti avea nevoie de oua: fierte sau golite sau de lemn, cum va plac.
First, for all three techniques you will need eggs: hard boiled, blown out or wooden, as you wish


Pentru ouale poleite aveti nevoie de:
1. foita de imitatie de aur; 2. un catel de usturoi; 3. pensula
For gold leaf eggs:
1. gold leaf; 2. garlic; 3. brush

Pentru ouale cu vopsea aurie aveti nevoie de:
1. vopsea efect pentru oua auriu (eu am folosit Carmin Nunate de poveste); 2. pensula
For gold dye eggs:
1. gold dye for eggs; 2. brush

Pentru ouale glitter aveti nevoie de:
1. sclipici auriu; 2. aracet; 3. pensula
For glitter eggs:
1. golden glitter; 2. modpodge; 3. brush


Oua poleite:
In mod normal foita metalica se aplica cu un adeziv lichid special, dar pentru ca nu stiu cat este de toxic acel adeziv si cat poate patrunde in ou prin coaja poroasa, am folosit o tehnica veche pe care am vazut-o la realizarea icoanelor pe sticla: sucul de usturoi - in momentul in care se usuca devine foarte lipicios
1. pisati bine de tot un catel de usturoi pana scoateti toata zeama din el
2. inmuiati pensula in zeama fara a lua si bucati de usturoi si aplicati pe ou tuse de pensula din loc in loc
3. luati cu degetele foita de aur fara cat mai usor, este foarte fina si se rupe foarte repede, si aplicati-o pe ou
4. folositi degetele pentru a tampona foita pe ou; in locurile in care am pus usturoi aceasta va ramane lipita; lasati-l sa se usuce
Gold leaf eggs:
Usually for gold leaf you need size or a special adhesive, but because I don't know how safe that adhesive is and because the eggshell is porous and can absorb it, I used an old technique which I first saw in icons making: garlic juice - whet it dries it becomes really sticky
1. crush a garlic clove until you get all the juice out
2. dip the brush in that juice but be careful not to get garlic bits on it and apply a few touches on the egg
3. take the leaf with your fingers but be careful because it is very fragile and it breaks easily, and apply it on the egg
4. use your fingers to tap the leaf on the egg; the leaf will adhere on the garlic covered spots; let it dry   


Oua vopsite:
Pentru aceste oua am gasit in magazin un set de 3 vopsele in nunate metalice: argintiu, aramiu si auriu.
1. pregatiti vopseaua conform indicatiilor de pe ambalaj si puneti cateva picaturi de vopsea pe o farfurie
2. fixati oul intr-un suport si cu ajutorul pensulei vopsiti jumatate din el in auriu pentru a crea efectul de colorblocking; lasati-l sa se usuce
Dyed eggs:
For these eggs I found in store some metallic gold dye for eggs 
1. prepare the dye following the package instructions, then pour some dye on a plate
2. put the egg in an egg cup and with the brush start painting half of the egg to get a colorblock effect; let it dry


Oua glitter:
Desi arata extraordinar v-as sfatui sa nu faceti ouale fierte cu sclipici ci doar pe cele golite sau doar unul doua fierte pe care sa nu le mancati. Chiar daca aracetul nu este toxic si se poate aplica pe ou, sclipiciul asa cum stiti se imprastie peste tot. Iar in momentul  in care il veti coji tot sclipiciul va ajunge pe albus si nu veti mai putea scapa de el. 
1. aplicati aracet pe ou cu ajutorul pensulei
2. asezati oul pe o coala de hartie si turnati peste el sclipici direct din borcan; scuturati apoi surplusul de sclipici si lasati-l sa se usuce. 
Glitter eggs:
Although it looks absolutely fabulous I would advise not to use this technique on boiled eggs but rather on the blow out or one or two boiled eggs that you don't plan ti eat. Even if the Mod Podge is not toxic and you can use it on the eggshell, the glitter as you know it scatters all over the place. So when you'll try to remove the eggshell it will cover your egg white and there is no way you can get rid of it.  
1. apply Mod Podge on the egg using a dry brush
2. put the egg on a sheet of paper and pour glitter on it directly from the jar; remove the excess glitter and let dry


Pregatiti-va pantofii cu toc pentru ca Pastele acesta va veti putea incanta invitatii cu o masa super eleganta si glam. 
Prepare your stilettos because this Easter you will impress your guest with a very elegant and glamorous dinner. 

Cu drag,
Love,
L.


Sunday Smoothie: Banane & Pepene/ Banana & Melon

Daca ati mai rasfoit blogul meu stiti deja ca anotimpul meu preferat e vara. Pe langa inghetata de ciocolata si limonada cu  menta mai este un lucru de care nu ma pot desparti in anotimpul cald: pepenele. Rosu sau galben cu sau fara samburi e nelipsit din frigider. Dar chair daca mai avem un pic de asteptat pana la vara nu inseamna ca nu ne putem rasfata cu un smoothie de pepene galben care sa ne aduca aminte de ce e atat de frumoasa vara.
If you went through my blog posts before you probably know that my favorite seasons is summer. Besides chocolate ice cream and mint lemonade there is one more thing I can't live without in summer: melon. Watermelons, cantaloupe, seedless or not you can always find it in my fridge. Even if we still have a little to wait for summer it doesn't mean we can't spoil ourselves with a banana melon smoothie to remember us why is summer so great.


Ingrediente: 2 banane, 4 felii de pepene galben, 1 cana de iaurt dulce, 1 lingura miere, 1 lingura musli pentru decor
Ingredients: 2 bananas, 4 slices of melon; 1 cup sweet yogurt, 1 tbsp honey, 1 tbsp granola to garnish


Duminica placuta!
Enjoy your Sunday!
L.


Pin It button on image hover